DLTK's Fairy Tales
Paper Bag Princess Puppet
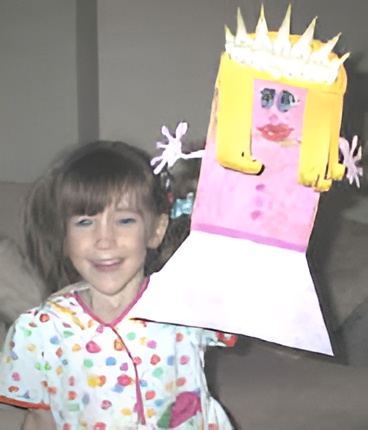 Create your very own princess puppet inspired by the classic fairy tales using a simple paper lunch bag and easy-to-find materials.
This fun and engaging craft involves painting, cutting, and gluing to bring your princess to life. Young learners will enjoy personalizing their puppets with colorful hair, a crown, and creative details. Perfect for imaginative play and storytelling, this craft provides a delightful hands-on experience for both home and classroom activities.
Materials:
- a paper lunch bag
- a printer and paper
- pink paint (or construction paper)
- yellow, brown, black or orange construction paper (hair)
- scissors
- glue and/or tape
- something to color with
GET FAMILIAR WITH YOUR PAPER BAG:
- We're going to go through this slowly, so bear with me.
Look at your paper bag. - It should be closed and flat like a piece of paper. Just like when they are brand new.
- On one side, it's all smooth. This will be the
BACK of your puppet
- It's important that all the kids get the back and front straight at the beginning!
- On the other side there's a flippy tab (which is typically the bottom of
the bag when you're carrying your lunch around...)
- This flippy tab will be the puppet's HEAD
- Look at the rest of the front of the bag. (The 3/4 or so of the bag below the part with the flippy tab) This will be the BODY.
- Look at the sides of the bag. There should be a
SIDE FLAP of paper.
- We'll be slipping the arms into this flap.
- If the kids goof and glue the arms onto the front or back of the bag, it isn't a big deal.
- OK, now that we're comfy with our bags, let's craft (you can always peek at the photo above if you get confused)!
PUTTING THE PUPPET TOGETHER
- Paint the HEAD and BODY of your paper bag pink (we don't have many paints in our house -- just red,
yellow, blue, black and white. We mix all of our own colors which is loads of
fun for the girls). Set aside to dry.
OR - As an alternative to painting: trace the head and body of the paper bag
onto pink construction paper. Cut each out and glue them to the bag.
- Print the template pieces.
- The large (triangle with the top cut off) from template 2 is the princess's skirt.
- three of the small dots are buttons and one of them is her nose
- color the pieces
- Cut out the pieces
- Take a piece of "hair colored" construction paper and cut out two
rectangles ABOUT 3 inches by 6 inches (the size doesn't have to be exact).
- cut 2 strips into each of these pieces (the long way) to make strands of hair
- curl the hair with a pencil
- glue the hair to either side of the head
- BANGS: Cut a third piece of paper as wide as the bag by about 2
inches. Glue it to the top of the head
- By this time, your bag should be dry (if you had to color in the pieces. If you chose the color version you'll likely have to wait a bit here).
- Glue the crown to the bangs
- Glue the eyes, nose and mouth onto the head
- Glue the skirt (triangle with the top cut off) to the bottom of the body.
- Glue the arms into the SIDE FLAP. When you do this, glue or tape them onto the top of the flap not the bottom. That way when you're using the puppet, it's arms will reach forward in a hugging motion instead of bending way backwards. Now, I give these instructions to make sure I've given you as much info as I can -- use your judgement when balancing whether to share the directions with the kids or let them get creative on their own
- OPTIONAL: You can personalize your basic princess puppet in a lot of
ways. By this point the Age 2 thru 4 group will be happy (going further may
make the project too time consuming for their young attention spans), but
older children might like to extend the craft. Here are just a few ideas for
them:
- Draw marker or paint freckles and/or eyebrows on the face
- Add glitter glue designs to the dress/skirt
- Add a lace or fabric fringe to the bottom of the skirt
- Glue something into the princess's hand (a round piece of yellow
construction paper or gold gift wrap work well as the "golden ball")
OR - Put a small piece of velcro on the princess's hand. Put Velcro on numerous objects. That allows you to change the princess's "props" during a puppet show. If you chose to do this, you'll want to back the princess's arm with a thin piece of cardboard (old cereal box) so it doesn't flop around.
Templates
- Close the template window after printing to return to this screen.
- Set page margins to zero if you have trouble fitting the template on one page (FILE, PAGE SETUP or FILE, PRINTER SETUP in most browsers).
Template color or B&W
Template color or B&W
Print friendly version of these instructions